In this article we will learn about mipmapping, an important technique for rendering textured objects at a distance. We will find out why mipmapping is important, how it complements regular texture filtering, and how to use the blit command encoder to generate mipmaps efficiently on the GPU.
Download the sample code for this article here.
A Review of Texture Filtering
In previous articles, we have used texture filtering to describe how texels should be mapped to pixels when the screen-space size of a pixel differs from the size of a texel. This is called magnification when each texel maps to more than one pixel, and minification when each pixel maps to more than one texel. In Metal, we have a choice of what type of filtering to apply in each of these two regimes.
Nearest filtering just selects the closest texel to represent the sampled point. This results in blocky output images, but is computationally cheap. Linear filtering selects four adjacent texels and produces a weighted average of them.
In Metal, we specify type of filtering to use in the minFilter and magFilter properties of a MTLSamplerDescriptor.
Mipmap Theory
The name “mipmap” comes from the Latin phrase “multum in parvo”, roughly meaning “much in little”. This alludes to the fact that each texel in a mipmap combines several of the texels in the level above it. Before we talk about how to build mipmaps, let’s spend some time talking about why we need them in the first place.
The Aliasing Problem
You might think that because we’ve handled the case of texture minification and magnification, our texture mapping should be perfect and free of visual artifacts. Unfortunately, there is a sinister effect at play when a texture is minified beyond a certain factor.
As the virtual camera pans across the scene, a different set of texels are used each frame to determine the color of the pixels comprising distant objects. This occurs regardless of the minification filter selected. Visually, this produces unsightly shimmering. The problem is essentially one of undersampling a high-frequency signal (i.e., the texture). If there were a way to smooth the texture out in the process of sampling, we could instead trade a small amount of blurriness for a significant reduction in the distracting shimmering effect during motion.
The difference between using a linear minification filter and a linear minification filter combined with a mipmap is shown below, to motivate further discussion.

The Mipmap Solution
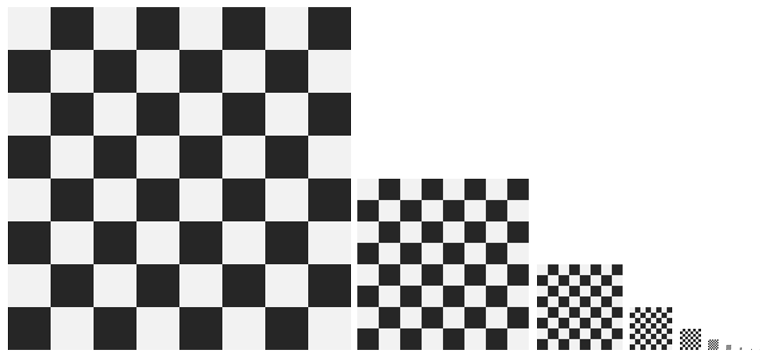
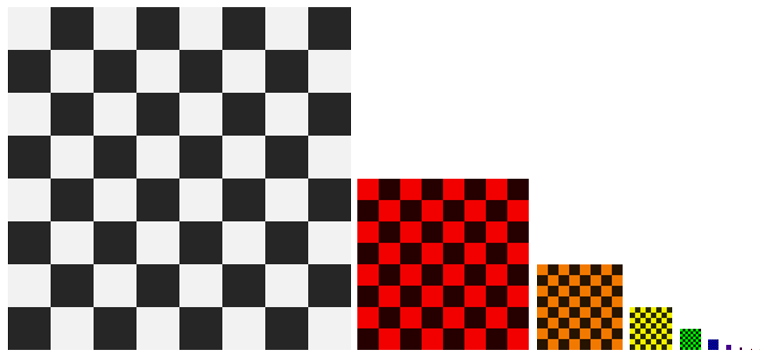
Mipmapping is a technique devised to solve this aliasing problem. Rather than downsampling the image on the fly, a sequence of prefiltered images—called levels—are generated, either offline or at load time. Each level is a factor of two smaller (along each dimension) than its predecessor. This leads to a 33% increase in memory usage for each texture, but can greatly enhance the fidelity of the scene in motion.
In the figure below, of the levels generated for a checkerboard texture are shown.
Mipmap Sampling
When a mipmapped texture is sampled, the projected area of the fragment is used to determine which mipmap level most nearly matches the texture’s texel size. Fragments that are smaller, relative to the texel size, use mipmap levels that have been reduced to a greater degree.
In Metal, the mipmap filter is specified separately from the minification filter, in the mipFilter property of the descriptor, but the min and mip filters interact to create four possible scenarios. They are described below in order of increasing computational cost.
When minFilter is MTLSamplerMinMagFilterNearest and mipFilter is MTLSamplerMipFilterNearest, the closest-matching mipmap level is selected, and a single texel from it is used as the sample.
When minFilter is MTLSamplerMinMagFilterNearest and mipFilter is MTLSamplerMipFilterLinear, the two closest-matching mipmap levels are selected, and one sample from each is taken. These two samples are then averaged to produce the final sample.
When minFilter is MTLSamplerMinMagFilterLinear and mipFilter is MTLSamplerMipFilterNearest,
the closest-matching mipmap level is selected, and four texels are averaged to produce the sample.
When minFilter is MTLSamplerMinMagFilterLinear and mipFilter is MTLSamplerMipFilterLinear, the two closest-matching mipmap levels are selected, and four samples from each are averaged to create a sample for the level. These two averaged samples are then averaged again to produce the final sample.
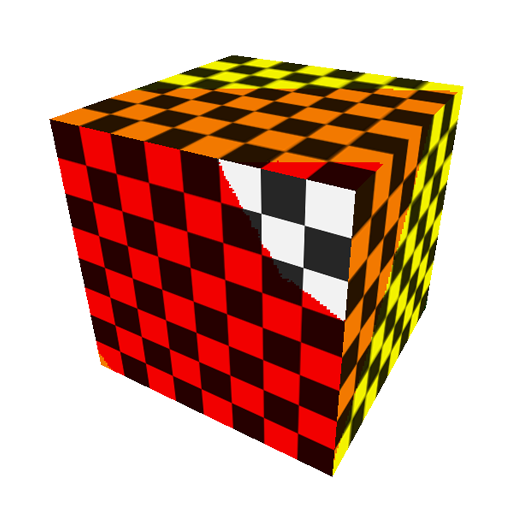
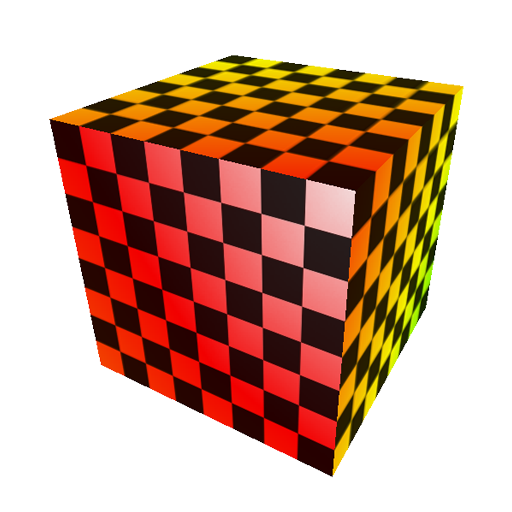
The figure below shows the difference between using a nearest and linear mip filter when a linear min filter is used:
Mipmapped Textures in Metal
Building a mipmapped texture in Metal is a two-part process: creating the texture object and copying image data into the mipmap levels. Metal does not automatically generate mipmap levels for us, so we’ll look at two ways to do the generation ourselves below.
Creating the Texture
We can use the same convenience method for creating a 2D mipmapped texture descriptor as for non-mipmapped textures, passing YES as the final parameter.
[MTLTextureDescriptor texture2DDescriptorWithPixelFormat:MTLPixelFormatRGBA8Unorm
                                                   width:width
                                                  height:height
                                               mipmapped:YES];
When the mipmapped parameter is equal to YES, Metal computes the mipmapLevelCount property of the descriptor. The formula used to find the number of levels is ![]() . For example, a 512×256 texture has 10 levels.
. For example, a 512×256 texture has 10 levels.
Once we have a descriptor, we request a texture object from the Metal device:
id<MTLTexture> texture = [device newTextureWithDescriptor:descriptor];
Generating Mipmap Levels Manually
Creating mipmap levels involves creating smaller and smaller versions of the base image, until a level has a dimension that is only one pixel in size.
iOS and OS X share a framework called Core Graphics that has low-level utilities for drawing shapes, text, and images. Generating a mipmap level consists of creating a bitmap context with CGBitmapContextCreate, drawing the base image into it with CGContextDrawImage, and then copying the underlying data to the appropriate level of the Metal texture as follows:
MTLRegion region = MTLRegionMake2D(0, 0, mipWidth, mipWidth);
[texture replaceRegion:region
           mipmapLevel:level
             withBytes:mipImageData
           bytesPerRow:mipWidth * bytesPerPixel]
For level 1, mipWidth and mipHeight are equal to half of the original image size. Each time around the mipmap generation loop, the width and height are halved, level is incremented, and the process repeats until all levels have been generated.
In the sample app, a tint color is applied to each mipmap level generated with Core Graphics so that they can be easily distinguished. The figure below shows the images that comprise the checkerboard texture, as generated by Core Graphics.
The Blit Command Encoder
The chief disadvantage to generating mipmaps on the CPU is speed. Using Core Graphics to scale the image down can easily take ten times longer than using the GPU. But how do we offload the work to the GPU? Happily, Metal includes a special type of command encoder whose job is to leverage the GPU for image copying and resizing operations: the blit command encoder. The term “blit” is a derivative of the phrase “block transfer.”
Capabilities of the Blit Command Encoder
Blit command encoders enable hardware-accelerated transfers among GPU resources (buffers and textures). A blit command encoder can be used to fill a buffer with a particular value, copy a portion of one texture into another, and copy between a buffer and texture.
We won’t explore all of the features of the blit command encoder in this article. We’ll just use it to generate all of the levels of a mipmap.
Generating Mipmaps with the Blit Command Encoder
Generating mipmaps with a blit command encoder is very straightforward, since there is a method on the MTLBlitCommandEncoder protocol named generateMipmapsForTexture:. After calling this method, we add a completion handler so we know when the command finishes. The process is very fast, taking on the order of one millisecond for a 1024×1024 texture on the A8 processor.
id<MTLBlitCommandEncoder> commandEncoder = [commandBuffer blitCommandEncoder];
[commandEncoder generateMipmapsForTexture:texture];
[commandEncoder endEncoding];
[commandBuffer addCompletedHandler:^(id<MTLCommandBuffer> buffer) {
    // texture is now ready for use
}];
[commandBuffer commit];
When the completion block is called, the texture is ready to be used for rendering.
The Sample App
The sample app shows a rotating, textured cube. You can use a tap gesture to alternate among several different modes: no mipmapping, mipmapping with a GPU-generated texture, mipmapping with a CPU-generated texture and linear mip filtering, and mipmapping with a CPU-generated texture and nearest mip filtering. The CPU-generated texture has a differently-colored tint applied to each level to make it obvious which levels are being sampled.
You can use a pinch gesture to zoom the cube closer and farther, which will cause different mipmap levels to be sampled, if mipmapping is enabled. You can also observe the degradation caused by not using mipmaps when the cube is nearly edge-on, or as it moves away from the camera.
Download the sample code for this article here.
Conclusion
In this article, we have looked at mipmapping, an important technique for reducing aliasing when texturing is in use. We learned why mipmapping is important, and how to generate mipmapped textures on the CPU and the GPU. We got a brief introduction to the blit command encoder, a powerful tool for performing GPU-accelerated copy and fill operations between Metal resources.
Hi, warren
Thanks for your example.
I think blit command encoder is used for transfer gpu resources between different gpu targets. And minmap is one of useful method. My question is how to get gpu resources like textures buffers into cpu memory faster in Metal?
Can you give us some examples?
thx
I have a general question about addCompletedHandler. In a simple scenario you will create a command buffer, create encoder from it like the following;
MTL::CommandQueue *queue;auto cmd_buffer = queue->commandBuffer();
auto encoder = cmd_buffer->computeCommandEncoder();
// do stuff on encoder
cmd_buffer->addCompletedHandler(....);
cmd_buffer->commit();
cmd_ buffer->release(); // I assume you can't release cmd_buffer here because its still used on the GPU? and completed handler is called?
If you know you are not using the cmd_buffer after its completed, would you be releasing it in the Handler?
I would not release it in a completed handler. In Obj-C and Swift, it would be released by an autorelease pool, and I think that’s the right way to handle it here too.
See, for example, this metal-cpp sample, which demonstrates how to use a per-frame autorelease pool and also uses a completed handler, without a manual call to
release.