In this article, I will outline how to render high dynamic range (HDR) video with Metal. In contrast to rendering standard dynamic range (SDR) content, where we can sometimes get away without paying too much attention to color management, there are many important subtleties to rendering HDR colors accurately.
A lot of the heavy lifting will be done by AVFoundation, which handles video file format decoding and playback. We will also look at lower-level APIs in Core Video and Core Animation that make it easier to work with video content when rendering with Metal.
Our chief aim is to build a simple HDR video player, but the concepts we discuss and their implementation are applicable in any context where you need to ingest HDR content in Metal and render it with your own imaging pipeline or engine.
You can find the sample code for this article here.
What is HDR?
HDR, an abbreviation of high dynamic range, is a term with many connotations. What they have in common is that they in some sense contrast with SDR, or standard dynamic range. SDR refers to the dynamic range and brightness capabilities of traditional TVs and monitors, which SDR standards assume to be capable of producing about 100 nits (S.I. unit  ) of brightness. HDR, then, refers to content, formats, and displays capable of exceeding this range. Since the mid-2010s, HDR TVs have proliferated in tandem with HDR content, and nowadays, most smartphones are capable of capturing photos and videos in HDR.
While HDR imaging and rendering have been around for decades, much early work went into adapting HDR color values for SDR displays, a process known as tonemapping. Tonemapping is a lossy process. Highlights that exceed the maximum displayable brightness must be either clipped or rolled off to the maximum displayable value, losing dynamic range in the process. Tonemapping remains an important part of modern HDR rendering pipelines because, although displays have improved drastically over the past decade, they still cannot accurately portray the dynamic contrast between the inkiest blacks and the overwhelming brightness of the Sun.
What is EDR?
EDR, by contrast, stands for “Extended Dynamic Range.” It is not a format, but rather a representation of HDR and a set of technologies used by Apple platforms to adaptively display HDR content. The closest familiar analogy might be to a color management system. When you supply EDR values to the system, EDR optimizes their presentation according to the capabilities of the display and its current state, including the brightness setting.
It has long been possible to opt into color management for Metal content by setting the colorspace property on CAMetalLayer: this property informs the system compositor of the actual color space of your content, since the pixel format by itself often isn’t enough. It can then adapt the colors in your drawables to match the display’s color settings. EDR takes this a step further by adaptively displaying high dynamic range content by taking into account display brightness and other conditions.
One of EDR’s core strengths is its ability to adapt to many different display types, from traditional SDR monitors (which are commonly assumed to have a peak brightness of about 100 nits), to the powerful Pro Display XDR, with its peak brightness of 1600 nits. With EDR, you can supply the same content stream to the display and be assured that it will be adapted to the output device in its current state.
Since both ambient conditions and the user can change the display brightness dynamically, EDR does not have a fixed maximally bright value. Instead, you can query various APIs to determine how much brighter than SDR reference white your HDR highlights can be without clipping. The ratio between the maximally bright value that can currently be displayed and reference white is called (EDR) headroom. We will see how to work with headroom values toward the end of this article.
Note that whenever I say “reference white,” you should think of the brightest white in standard dynamic range. This level (EDR value 1.0) corresponds to “pure white” in a user interface and is near the brightness of the subject of a well-exposed photograph. In an EDR context, values above 1.0 encode highlights and emissive surfaces, and can be many times higher than 1.0.
Color Spaces
An RGB color space is defined by a white point chromaticity and set of RGB primaries in CIE XYZ space, which collectively tell us its gamut, the range of colors it can represent. It also includes a transfer function, which provides a mapping from pixel values to corresponding light values.
If you have worked with images and colors before, you may be familiar with a color space called “sRGB,” the standard RGB color space. Because a color space includes both a gamut and a transfer function, the term “sRGB” is ambiguous per se. It is possible to construct a “Linear sRGB” color space, which is just a color space that uses sRGB’s white point and primaries but has a linear transfer function (R′G′B′ = RGB). You could also use the sRGB transfer function independent of the sRGB gamut.
The sRGB gamut was standardized in 1999 as a compromise between the limited precision of 8-bit images and the desire to faithfully represent as many colors as possible. By modern standards, it covers a tragically small portion (less than 40%) of the human visual spectrum.
“Extended” color spaces were introduced in part to address this. Ordinarily, 8-bit color components are normalized into the [0, 1] range for manipulation by shaders. By allowing color components to go outside this range, it is possible to preserve the primaries of a color space while reaching colors outside of its gamut by extrapolating. Such values can be stored in slightly larger formats, using perhaps 10 bits per channel, to squeeze more usefulness out of these aging color spaces.
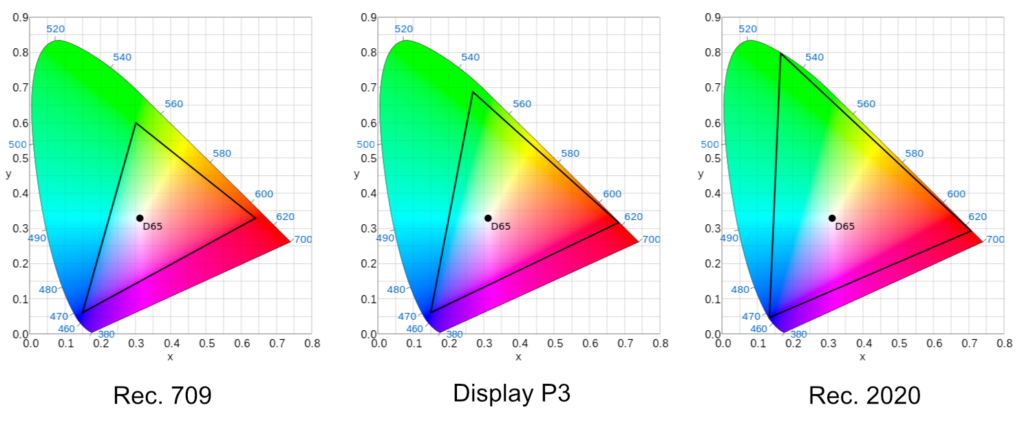
Ultimately, though, it became necessary to define new color spaces for the modern era. One early such color space, DCI-P3 was adapted by Apple into Display P3, which is now the color space preferred by most Apple displays. Display P3 uses DCI-P3’s primaries while adopting sRGB’s white point (D65) and transfer function. Another popular color space in the realm of HDR video specifically is Rec. 2020 (published as Recommendation ITU-R BT.2020). Rec. 2020’s gamut is vastly larger than either sRGB or P3.
Both P3 and Rec. 2020 are capable of representing the colors found in HDR media, but this isn’t the end of the story. When rendering HDR values, we are almost necessarily working with luminances that are brighter than the whitest white. This is because HDR photos and videos are exposed so that bright whites in the subject are at or near reference white, while intense specular highlights and light sources are even brighter. On an SDR display, these highlights simply “blow out” or “clip” to pure white. What makes HDR displays literally shine is the fact that they can reproduce colors beyond SDR reference white.
With the need to render broader ranges of colors came new transfer functions. The most common transfer functions today are HLG (Hybrid Log-Gamma) and PQ (Perceptual Quantizer). HLG is designed to preserve the transfer of SDR content while managing the rolloff of bright highlights; in fact, it exactly matches the SDR transfer function over the range of SDR values. PQ, on the other hand, breaks from legacy content and is used by formats such as HDR10 and Dolby Vision. Knowing the expected color space and transfer function of a piece of HDR content is crucial when it comes to accurately reproducing colors for display.
Now that we know a little bit more about how colors are represented, let’s take a look at how AVFoundation enables us to decode and work with HDR content.
Video Playback with AVPlayer
AVFoundation is a fantastically powerful framework for media decoding, playback, and composition. It sits atop the lower level media frameworks (Core Video, Video Toolbox, Core Media, etc.) and provides rich, high-level APIs for video playback and display. If you just need to play an HDR video in your app, you can use an AVPlayerLayer or SwiftUI VideoPlayer view, and it will just work.
On the other hand, if you want to render HDR video using Metal, perhaps to incorporate video content into a game or to apply filters in real time, things are a little more complex. Metal does not have built-in facilities for handling HDR content. Even so, HDR content can be stored in Metal textures and processed with Metal graphics or compute functions, as we will explore below.
Rendering HDR videos with Metal starts the same way as using higher-level APIs for video playback: you must first create an AVAsset.
To create an asset that references a video file on disk, you can create an instance of AVURLAsset:
let asset = AVURLAsset(url: url)
Creating an asset does not load it immediately or check that it can be played back. This means you should be prepared to handle errors that crop up when playback begins.
Once an asset exists, you can query various properties of the tracks it contains. For instance, to get the set of video tracks in an asset (while in a Swift async context), you can call loadTracks(withMediaCharacteristic:):
let videoTracks = try await self.asset.loadTracks(withMediaCharacteristic: .visual)
Similarly, to determine whether an asset contains HDR video, you can use the .containsHDRVideo characteristic:
let hdrTracks = try await asset.loadTracks(withMediaCharacteristic: .containsHDRVideo)
This is useful because HDR video rendering comes with significantly more demanding memory and processing costs than SDR, so being able to switch to an SDR code path is useful in production apps.
We will see later on how to use these and other asset properties to configure our own Metal HDR rendering pipeline.
In the meantime, to actually play an asset, we need to wrap it in an AVPlayerItem and then hand it to an AVPlayer, both of which are very straightforward to create:
let playerItem = AVPlayerItem(asset: asset)
let player = AVPlayer(playerItem: playerItem)
player.play()
If you were to write an app that just did these steps, you might hear audio, but wouldn’t see any visuals on the screen. AVPlayer manages playback, but it doesn’t actually create any video UI. That is the role of other APIs like AVPlayerLayer. In our case, we want to use Metal to process video, so we need a way to get video frames from AVFoundation and get them into a format that Metal understands.
Getting Frames with AVPlayerItemVideoOutput
Enter AVPlayerItemVideoOutput. This class is a highly customizable “tap” we can attach to an AVPlayerItem in order to get video frames during playback.
We ultimately need Metal textures in an HDR-capable pixel format. Although we could use a compact, 32-bit format like .bgr10a2Unorm to represent the common 10 bits of dynamic range of most HDR formats, this format is not sufficient for the APIs we will use below. Instead, we will select a half-precision floating-point format, .rgba16Float. This will allow us to store HDR values linearly with precision to spare.
To get Metal textures from AVFoundation, we will go through CoreVideo APIs, including CVPixelBuffer and CVMetalTextureCache. We will cover these steps in detail below, but to get started, we need to create a video output object that can produce pixel buffers in a known format.
AVPlayerItemVideoOutput takes an outputSettings dictionary that describes the desired video frame color space and pixel buffer format. The color space is described by a sub-dictionary with three keys, describing the color space primaries and transfer function, as well as the matrix used to convert chroma-subsampled Y′CbCr values into RGB values:
let videoColorProperties = [
  AVVideoColorPrimariesKey: AVVideoColorPrimaries_ITU_R_2020,
  AVVideoTransferFunctionKey: AVVideoTransferFunction_Linear,
  AVVideoYCbCrMatrixKey: AVVideoYCbCrMatrix_ITU_R_2020
]
This dictionary describes a linear color space with Rec. 2020 primaries. Later, we will configure our layer so that its contents are color-matched by the system, to the expected display gamut (most likely Display P3).
We incorporate this dictionary into our video output’s output settings dictionary, while also requesting wide color (HDR) values and indicating our desired pixel buffer format, kCVPixelFormatType_64RGBAHalf (which matches our ultimate Metal pixel format, .rgba16Float):
let outputVideoSettings: [String : Any] = [
  AVVideoAllowWideColorKey: true,
  AVVideoColorPropertiesKey: videoColorProperties,
  kCVPixelBufferPixelFormatTypeKey as String: NSNumber(value: kCVPixelFormatType_64RGBAHalf)
]

let videoOutput = AVPlayerItemVideoOutput(outputSettings: outputVideoSettings)
Adding a video output to an existing AVPlayerItem only requires calling the add(_:) method:
playerItem.add(videoOutput)
Now, during playback, we can periodically query the video output for pixel buffers holding the current frame’s colors. Suppose we are using MTKView to manage the timing of our drawing. In the draw(in:) method of our Metal view delegate, we can ask our video output whether it has a video frame at the current time:
let itemTime = videoOutput.itemTime(
                   forHostTime: CACurrentMediaTime())

if !videoOutput.hasNewPixelBuffer(forItemTime: itemTime) { return }

let pixelBuffer = videoOutput.copyPixelBuffer(
                      forItemTime: itemTime,
                      itemTimeForDisplay: nil)
It may be the case that the output does not have new pixels for us, in which case we can skip rendering, saving time and energy and pacing our playback to the video’s frame rate instead of the display refresh rate. Copying the pixel buffer can also fail, so if we don’t get a pixel buffer, we should drop the frame and wait for the next one.
Getting Metal Textures from CVPixelBuffers
We could manually copy the contents of the pixel buffer into a Metal texture ourselves, but a much more efficient option is available: CVMetalTextureCache. A Metal texture cache allows us to easily get a Metal texture for each frame, and more importantly, it manages creation and recycling of resources internally, all with a very simple interface.
We can create a Metal texture cache before we start rendering, providing a Metal device as the only mandatory parameter:
var textureCache: CVMetalTextureCache!
CVMetalTextureCacheCreate(nil, nil, device, nil, &textureCache)
self.textureCache = textureCache
During rendering, we can get a Metal texture from a pixel buffer with the CVMetalTextureCacheCreateTextureFromImage function:
let textureWidth = CVPixelBufferGetWidth(pixelBuffer)
let textureHeight = CVPixelBufferGetHeight(pixelBuffer)

var cvTexture: CVMetalTexture?
CVMetalTextureCacheCreateTextureFromImage(
    nil, textureCache, pixelBuffer, nil,
    targetPixelFormat, textureWidth, textureHeight, 0,
    &cvTexture)
We can’t render from a CVMetalTexture directly, but we can retrieve a Metal texture with the CVMetalTextureGetTexture function:
let frameTexture = CVMetalTextureGetTexture(cvTexture)
One important part of the contract with CVMetalTextureCache is that CVMetalTexture objects whose textures are in use must stay alive until that usage is complete. This prevents their resources from being recycled prematurely. We can achieve this in Swift by holding a strong reference to each CVMetalTexture instance we receive, releasing it in a Metal command buffer completed handler.
Rendering Video Frames with Metal
We now have a single frame of HDR as a Metal texture. Rendering such a texture is sufficiently straightforward that we won’t talk in depth about the process. It is literally just a single textured quad, rendered as a triangle strip, transformed so the video retains the correct aspect ratio.
What we do need to do is configure our Metal layer to opt into EDR rendering. The first step is to set the wantsExtendedDynamicRangeContent property to true:
metalLayer.wantsExtendedDynamicRangeContent = true
We also need to set an extended linear color space on the layer. This is because we will be storing unclamped values, potentially outside the [0, 1] range, in our drawables.
metalLayer.colorspace =
    CGColorSpace(name: CGColorSpace.extendedLinearITUR_2020)
Finally, we need to use a color pixel format that can store extended linear values. As above, we prefer .rgba16Float:
metalLayer.pixelFormat = .rgba16Float
If you were to run the code as we’ve discussed it up to this point, things would likely look okay. SDR video would render correctly, and HDR video with moderate highlights would look decent on an HDR display, if perhaps a little over-bright. On an SDR display, though, HDR video would look like a blown-out mess.
What we’re missing is tonemapping.
Tonemapping with EDR Metadata
One of the main goals of EDR is to harmonize SDR content and HDR content for viewing across a huge variety of display capabilities. As mentioned above, HDR content containing super-white highlights will be clipped by default, and sometimes this is the right choice. But to present HDR video optimally, we can engage an optional feature of EDR to produce more pleasing results.
EDR tonemapping is activated by providing detailed information about the mastering parameters of a piece of content. Specifically, for a video format like HDR10, a producer might choose to include the minimum and maximum luminance values of the video as metadata. These can be extracted at runtime and provided to EDR (via CAMetalLayer) so that it can perform tonemapping on our behalf when presenting HDR content to the screen.
We enable EDR tonemapping by assigning a CAEDRMetadata object to a layer’s edrMetadata property. There are several ways to create such an object, but we will look at just two here:
The hdr10(displayInfo:contentInfo:opticalOutputScale:) class method generates an HDR10 (PQ) metadata object based on authored display and content parameters, along with an output scale (most commonly set to SDR reference white in nits: 100.0). The hlg(ambientViewingEnvironment:) class method generates an HLG metadata object suitable for tonemapping HLG-encoded content.
But how do we know which function to use, and where do we get the parameters? There are no properties or methods on AVAsset or AVAssetTrack to determine them. Instead, we can inspect our CVPixelBuffer's attachments. Attachments are pieces of metadata that pertain to a frame or sequence of frames, and they can be queried with the CVBufferCopyAttachment function during rendering.
We can probe for HLG and HDR10 metadata with the following calls:
// HLG
let ambientViewingInfo =
    CVBufferCopyAttachment(imageBuffer,
        kCVImageBufferAmbientViewingEnvironmentKey, nil)

// HDR10
let masteringColorVolume =
    CVBufferCopyAttachment(imageBuffer,
        kCVImageBufferMasteringDisplayColorVolumeKey, nil)
let contentLightLevel =
    CVBufferCopyAttachment(imageBuffer,
        kCVImageBufferContentLightLevelInfoKey, nil)
Once detected, these values can be used to generate an EDR metadata object and assign it to a CAMetalLayer:
metalLayer.edrMetadata = metadata
We are not always lucky enough to have metadata in our HDR files, so if you are using EDR tonemapping, it may be helpful to assign a sensible default EDR metadata object to prevent highlights from blowing out, even if you don’t know the absolute maximum luminance to expect. See the sample code for details.
Tonemapping with Metal Shaders
Sometimes, you want to render HDR video content to a texture, but you don’t want to present it to a screen, and therefore can’t make use of CA’s EDR tonemapping. It may still be sensible to apply tonemapping, since otherwise highlights might get clipped further down the pipeline (by your own code or the compositor).
In one of the WWDC videos on EDR (“Explore HDR Rendering with EDR” from WWDC21), it is mentioned that AVFoundation does not decode HDR video formats to EDR. This might seem confusing at first, since we’ve been decoding HDR video formats with AVFoundation all along. But what it really means is that the values vended in CVPixelBuffers from AVFoundation are not automatically mapped for optimal display by EDR. Enabling EDR tonemapping, as we did above, does do this mapping, but now we’re concerned with how to get similar results when rendering off-screen.
For demonstration purposes, the sample code uses the EDR headroom values provided by the system. In practice, you would choose a headroom that best represents your rendering intent (1.0 to map to SDR, or some higher value to enable HDR highlights). The method for querying the available headroom varies across platforms. On macOS, we use the maximumExtendedDynamicRangeColorComponentValue property on NSScreen to get the current EDR headroom, while on iOS, we can use the UIScreen property currentEDRHeadroom. Each property is a CGFloat that indicates the multiple of reference white the display is ready to produce.
Tonemapping is an extremely deep topic that we won’t cover comprehensively. The essential idea is that mid-tones should scale up with output brightness, and highlights should be rolled off to preserve detail if possible (though extreme highlights might still clip).
The so-called Reinhard operator (cf. Reinhard et al., 2002) provides an easy way to map linear luminance values to the range [0, 1]. We can also take a hint from Burke et al. 2020 and use the maximum R, G, or B component to ensure that when scaling, we don’t exceed our target output value.
Combining these ideas, the heart of our tonemapper is the tonemap_maxrgb function, presented here in Metal Shading Language:
float3 tonemap_maxrgb(float3 x, float maxInput, float maxOutput) {
    if (maxInput <= maxOutput) {
        return x;
    }
    float a = maxOutput / (maxInput * maxInput);
    float b = 1.0f / maxOutput;
    float colorMax = max(x.r, max(x.g, x.b));
    return x * (1.0f + a * colorMax) / (1.0f + b * colorMax);
}
If the (assumed or actual) maximum luminance of the source is less than the desired maximum output level, we have nothing to do: colors, including highlights, will reproduce correctly without modification. On the other hand, we apply an S-shaped curve (Reinhard et al. formula (4)), scaled by the desired output level. This maps values of maximum brightness to the available headroom.
The tonemapping operator isn’t the whole story, though. Unlike when rendering with EDR tonemapping, we will request that video frames use their source video’s transfer function (i.e., HLG or PQ) in the Rec. 2020 color space. Thus, we need to decode from the appropriate format into linear space before applying tonemapping.
Tonemapping PQ to EDR
For PQ, we apply the electro-optical transfer function (EOTF) to map the nonlinear PQ signal to absolute luminance (in nits). The EOTF, reproduced from BT.2100, looks like this:
float3 eotf_pq(float3 x) {
    float c1 =  107 / 128.0f;
    float c2 = 2413 / 128.0f;
    float c3 = 2392 / 128.0f;
    float m1 = 1305 / 8192.0f;
    float m2 = 2523 / 32.0f;
    float3 p = pow(x, 1.0f / m2);
    float3 L = 10000.0f * pow(max(p - c1, 0.0f) / (c2 - c3 * p), 1.0f / m1);
    return L;
}
Putting these together, we have our final tonemapping function for PQ:
float3 tonemap_pq(float3 x, float hdrHeadroom) {
    const float referenceWhite = 203.0f;
    const float peakWhite = 10000.0f;
    return tonemap_maxrgb(eotf_pq(x) / referenceWhite, peakWhite / referenceWhite, hdrHeadroom);
}
This can be applied directly to PQ values sampled from a video frame to produce colors in a linear Rec. 2020 color space, suitable for rendering to screen or for further processing.
Tonemapping HLG to EDR
HLG is a slightly different beast. HLG is designed for backward compatibility between SDR and HDR television sets, so it uses a piecewise transfer function that requires special handling during decoding. We first map through the inverse OETF (opto-electronic transfer function), which maps the non-linear HLG values into relative linear light, then through the HLG OOTF (opto-optical transfer function), which produces nominal luminance. From there, we scale by the ratio between HLG peak white and SDR reference white, effectively taking us into the same space as our post-decoded PQ values. Then, we can apply the same maxRGB tonemapping curve as above. The HLG inverse OETF, OOTF, and final tonemapping driver function look like this in shader coder:
float3 ootf_hlg(float3 Y, float Lw) {
    float gamma = 1.2f + 0.42f * log(Lw / 1000.0f) / log(10.0f);
    return pow(Y, gamma - 1.0f) * Y;
}

float inv_oetf_hlg(float v) {
    float a = 0.17883277f;
    float b = 1.0f - 4 * a;
    float c = 0.5f - a * log(4.0f * a);
    if (v <= 0.5f) {
        return pow(v, 2.0f) / 3.0f;
    } else {
        return (exp((v - c) / a) + b) / 12.0f;
    }
}

float3 inv_oetf_hlg(float3 v) {
    return float3(inv_oetf_hlg(v.r),
                  inv_oetf_hlg(v.g),
                  inv_oetf_hlg(v.b));
}

float3 tonemap_hlg(float3 x, float edrHeadroom) {
    const float referenceWhite = 100.0f;
    const float peakWhite = 1000.0f;

    float3 v = ootf_hlg(inv_oetf_hlg(x), peakWhite);
    v *= peakWhite / referenceWhite;
    v = tonemap_maxrgb(v, peakWhite / referenceWhite, edrHeadroom);
    return v;
};
Consult the sample code to see exactly how these tonemapping functions are applied. I’ve tried to make it as easy as possible to see how values stored in PQ and HLG coded video frames turn into EDR values.
Conclusion
In this article we saw how to wrangle HDR video content for display with Metal, optionally rendering with the system’s EDR tonemapping or with our own manual tonemapping shaders. I hope this information proves useful to anyone dealing with HDR video content in their own projects.
I strongly recommend watching the following videos from WWDC’s past to get up to speed on EDR rendering:
- WWDC21 – “Explore HDR Rendering with EDR”
- WWDC22 – “Display HDR video in EDR with AVFoundation and Metal”
- WWDC22 – “Explore EDR on iOS”
The approach to tonemapping HDR for EDR was inspired by Christopher Cameron’s writings on tonemapping for Chromium.
You won’t get away with not tagging sRGB content on DCI-P3 display in SDR, I will find you and kill you.
It’s not as serious as all that, but generally speaking, the world would be a better place if all content were tagged with appropriate color space metadata.
Really appreciated the specific mention of setting wantsExtendedDyamicRangecontent and pairing it with the right layer colorspace. Totally fixed some weird brightness issues I was hitting in my Metal project. Super helpful, thanks!
Do you have an idea of how we can achieve HDR rendering on AppleTV? There is no
metalLayer.wantsExtendedDynamicRangeContent
available on AppleTV.
Unfortunately I haven’t worked with HDR video rendering on tvOS. It might be the case that the new
preferredDynamicRangeproperty onCALayerhelps with this, but I haven’t tried it yet.Okay, thanks for the input 🙂