Introduction
This post explores a little-known feature of alpha blending in Metal: dual-source blending. We’ll start with a quick overview of blending, then look at why dual-source blending exists and how it works. We’ll use it to make an sRGB-agnostic GUI system compatible with sRGB render targets, then refine the approach with programmable blending.
The Alpha Channel
We often store images with four components per pixel: red, green, blue, and alpha (RGBA). Each component is also called a channel. RGB is straightforward: three primary colors define a gamut, and their combinations allow us to specify any visible color. (In practice, finite precision and display limitations narrow the set of colors we can reproduce.)
Alpha is less direct. Depending on the context, it can represent opacity (the inverse of transparency), geometric presence (“coverage”), or how much the background should show through the foreground. That flexibility makes alpha useful for blending translucent surfaces, rendering smoke and clouds, and combining images in many other ways.
Alvy Ray Smith and Ed Catmull, who later cofounded Pixar, introduced the alpha channel to computer graphics. They drew inspiration from cinematic mattes, which let filmmakers selectively combine elements of a scene.
Blending and Compositing
Blending describes how graphics hardware combines source and destination colors to produce a final pixel. We use the term “alpha blending” when alpha affects that combination.
In real-time graphics, blending is usually a fixed-function operation that happens after the fragment shader runs. The blend configuration tells the GPU how to combine the shader’s output (the source) with the existing framebuffer value (the destination).
Two equations control blending: one for RGB and another for alpha.
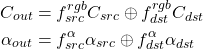
Here’s what the symbols mean:
| Symbol | Meaning |
|---|---|
 | The source color components (RGB) |
 | The destination color components (RGB) |
 | The source alpha component |
 | The destination alpha component |
 | The source RGB factor |
 | The destination RGB factor |
 | The source alpha factor |
 | The destination alpha factor |
 | An operator, such as add or subtract |
In words, the RGB equation multiplies the source color by its blend factor, does the same for the destination color, and then combines the two results. Metal can add, subtract, reverse-subtract, or take the minimum or maximum.
As an example, consider drawing a partially transparent image over a background. Each source pixel’s alpha determines how much of its color appears over the destination. Porter and Duff called this operation “A over B” in their landmark paper on image compositing. Its familiar blend equations are:

(This first example uses “straight” source colors and assumes an opaque destination for the RGB result. We’ll cover premultiplied (“associated”) alpha shortly.)
With an opaque destination, the color equation is just linear interpolation between source and destination RGB. The alpha equation also behaves as expected: the output grows more opaque with the source alpha. An opaque destination stays opaque.
Blending in Metal
In Metal, each color attachment on the render pipeline descriptor has its own blend settings.
First, enable blending on the attachment:
let att = renderPipelineDescriptor.colorAttachments[0]

att.isBlendingEnabled = true
Next, set the source factor, destination factor, and blend operation for both RGB and alpha. This configuration accepts straight source RGB and implements “source over”:
att.sourceRGBBlendFactor = MTLBlendFactor.sourceAlpha
att.destinationRGBBlendFactor = MTLBlendFactor.oneMinusSourceAlpha
att.rgbBlendOperation = MTLBlendOperation.add

att.sourceAlphaBlendFactor = MTLBlendFactor.one
att.destinationAlphaBlendFactor = MTLBlendFactor.oneMinusSourceAlpha
att.alphaBlendOperation = MTLBlendOperation.add
Associated Alpha and Premultiplication
It is often useful to store RGB with alpha already “baked in” by multiplying each color channel by alpha. In 8-bit color, for example, half-transparent red becomes (128, 0, 0, 128) instead of (255, 0, 0, 128). Images that store premultiplied colors have associated alpha.
Premultiplication can save some work during compositing, but its bigger advantage is correctness. Blinn’s 1994 column on the subject covers the details. For now, the key point is that antialiasing, filtering, and interpolation behave much better with premultiplied colors.
Formats with transparency may store non-premultiplied colors, which we call straight alpha. PNG defines its samples this way, although an image-loading API may return premultiplied pixels. It is often useful to premultiply straight-alpha pixels while loading them1.
For premultiplied colors, let  . Porter–Duff “over” then becomes

Because the source RGB already includes alpha, the blend unit must not multiply it by alpha again. In Metal, we change the source RGB blend factor to .one:
att.sourceRGBBlendFactor = MTLBlendFactor.one
Constant Blend Colors
Before we get to dual-source blending, it’s worth covering another useful feature: constant blend colors. A blend color supplies values that the blend unit can use as factors, which enables effects such as tinting and fading.
You set the blend color on the command encoder, so it can change between draw calls. This call sets a value corresponding to premultiplied, half-transparent yellow:
commandEncoder.setBlendColor(
  red: 0.5, green: 0.5, blue: 0.0, alpha: 0.5)
Metal provides four factors for this feature:
MTLBlendFactor.blendColorMTLBlendFactor.oneMinusBlendColorMTLBlendFactor.blendAlphaMTLBlendFactor.oneMinusBlendAlpha
When you select one of these options, the blend unit uses the corresponding components of the constant color as its factor.
Dual-Source Blending
Now for the main topic: dual-source blending.
Motivation
We’ve already seen several uses for blending: compositing images, rendering transparent surfaces, and applying effects such as tinting. Each one uses a different blend configuration and, in some cases, a constant blend color.
Sometimes a constant color isn’t flexible enough. One example is subpixel antialiasing on lower-resolution LCDs. This technique uses the physical layout of the red, green, and blue subpixels to increase effective horizontal resolution and make text clearer. This blog post gives a good overview of using dual-source blending for subpixel text. Retina-class displays have made the technique less important—macOS dropped it in 2018—but it helped make text legible for many years.
Dual-source blending can also approximate absorptive materials such as water and stained glass. One source supplies emitted or reflected light, while the other controls how much of each destination color channel passes through.
Dual-Source Blending in Metal
In practice, dual-source blending lets a fragment shader emit two colors for one render target. The blend unit can then use the second color as a factor.
In a basic single-target pipeline, the fragment shader returns a four-channel floating-point color. It can return a float4, a half4, or a structure that names the target explicitly:
struct FragOut {
  float4 outColor [[color(0)]];
};
Dual-source blending requires an output structure because the shader returns two values:
struct DualSourceFragOut {
float4 outColor [[color(0), index(0)]];
float4 blendColor [[color(0), index(1)]];
};
The index attribute marks the primary (0) and secondary (1) outputs.
The meaning of the secondary color depends on the effect. For subpixel-antialiased text, it holds a coverage value for each color channel. For absorptive water, it might hold per-channel transmittance based on the water’s optical depth at that pixel.
On the API side, you can reference the secondary output with any of these blend factors:
MTLBlendFactor.source1ColorMTLBlendFactor.oneMinusSource1ColorMTLBlendFactor.source1AlphaMTLBlendFactor.oneMinusSource1Alpha
The selected factor then reads from the secondary output.
Apple added dual-source blending in macOS 10.12 and iOS/tvOS 11.0 across all Metal-capable devices, so support for it is universal unless you are supporting truly old OS versions.
A Curious Use Case: ImGui + sRGB
This post grew out of my attempts to render Dear ImGui into an sRGB target. If dual-source blending seems like an odd fit for that problem, don’t worry. It surprised me too.
The sRGB that Isn’t
As of 2026, ImGui still has no consistent color-space model, despite a decade of discussion. GitHub tells the story:
Most of these issues come from people trying to use sRGB render targets. When you sample an sRGB-format texture, the GPU decodes its RGB components into linear-light values. When you render to an sRGB attachment, the fragment shader supplies linear-light RGB, blending happens in that linear domain, and the GPU encodes the result as sRGB when it stores it. Alpha is not transformed.
Filtering, interpolation, and blending generally behave better2 with linear values.
In practice, ImGui’s packed colors are treated as sRGB-encoded values. They produce the expected appearance when rendered into non-sRGB framebuffers, but interpolation and shader math then operate directly on those encoded numbers. As a result, ImGui content looks subtly wrong in a real sRGB target. The same problem appears when ImGui composites externally rendered sRGB content.
Several fixes have been proposed: convert theme colors to linear space, patch the vertex shader, or patch the fragment shader. Some are more sophisticated than others, but none creates a complete linear-light workflow. Once sRGB-encoded vertex colors have been interpolated, a fragment shader cannot recover the result that linear-light interpolation would have produced.
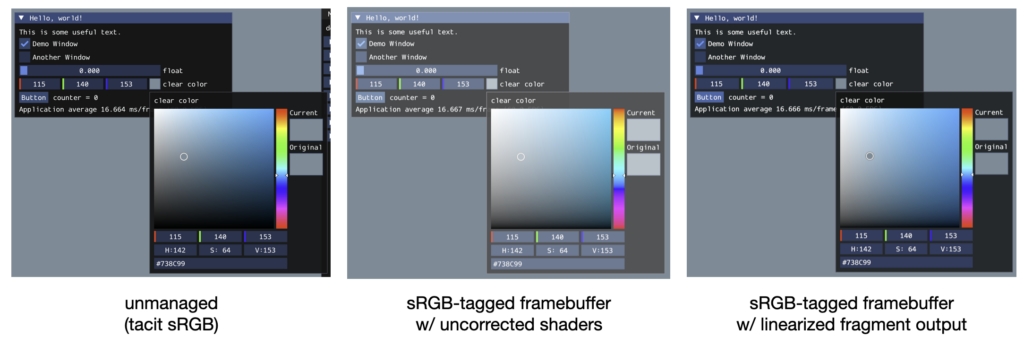
Adding a robust linear-light workflow to ImGui would be a major project. The codebase is large, and many third-party projects rely on its current behavior. Still, I wasn’t willing to give up sRGB render targets.
A New Hack
The existing hacks weren’t accurate enough for me, so I tried another one. Decoding sRGB values to linear light in the fragment shader looks plausible—until you open a color picker or draw a multicolor gradient.
This comment helped me understand what was still wrong. Let  be the standard sRGB decoding function, and let and be source and destination RGB values encoded as sRGB. If the fragment shader only decodes the source, fixed-function blending produces this linear-light value before the render target encodes it:

That is correct linear-light compositing, but it doesn’t reproduce ImGui’s usual appearance. To match the blend that ImGui gets on a non-sRGB target, we instead need this value before the render target encodes it:

The linked comment uses premultiplied-alpha blending. It multiplies the source RGB by alpha in the sRGB-encoded domain, then decodes the product. It also transforms alpha so that the destination factor becomes  :
:
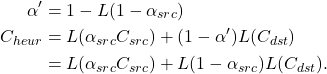
This is a heuristic rather than an algebraic rearrangement of  , but it often looks closer than ordinary linear-light blending.
Could the existing blend hardware produce an even closer approximation? We’d need a few more knobs on the blend equation…
As you may have guessed, the answer is dual-source blending.
We need to approximate the sRGB-blended result, which depends on both the source and destination. The shader can’t read the destination, so the formula must work across its full range. There is another limit: once the shader’s two outputs are fixed, the blend result is an affine function of the destination. Without reading the destination, we can’t use higher-order fits such as polynomials.
The figure below shows the approach for a source value of 0.75 and an alpha of 0.5. An affine function approximates the desired result across the full destination range. The shader performs this math for each color channel; the figure shows only one.
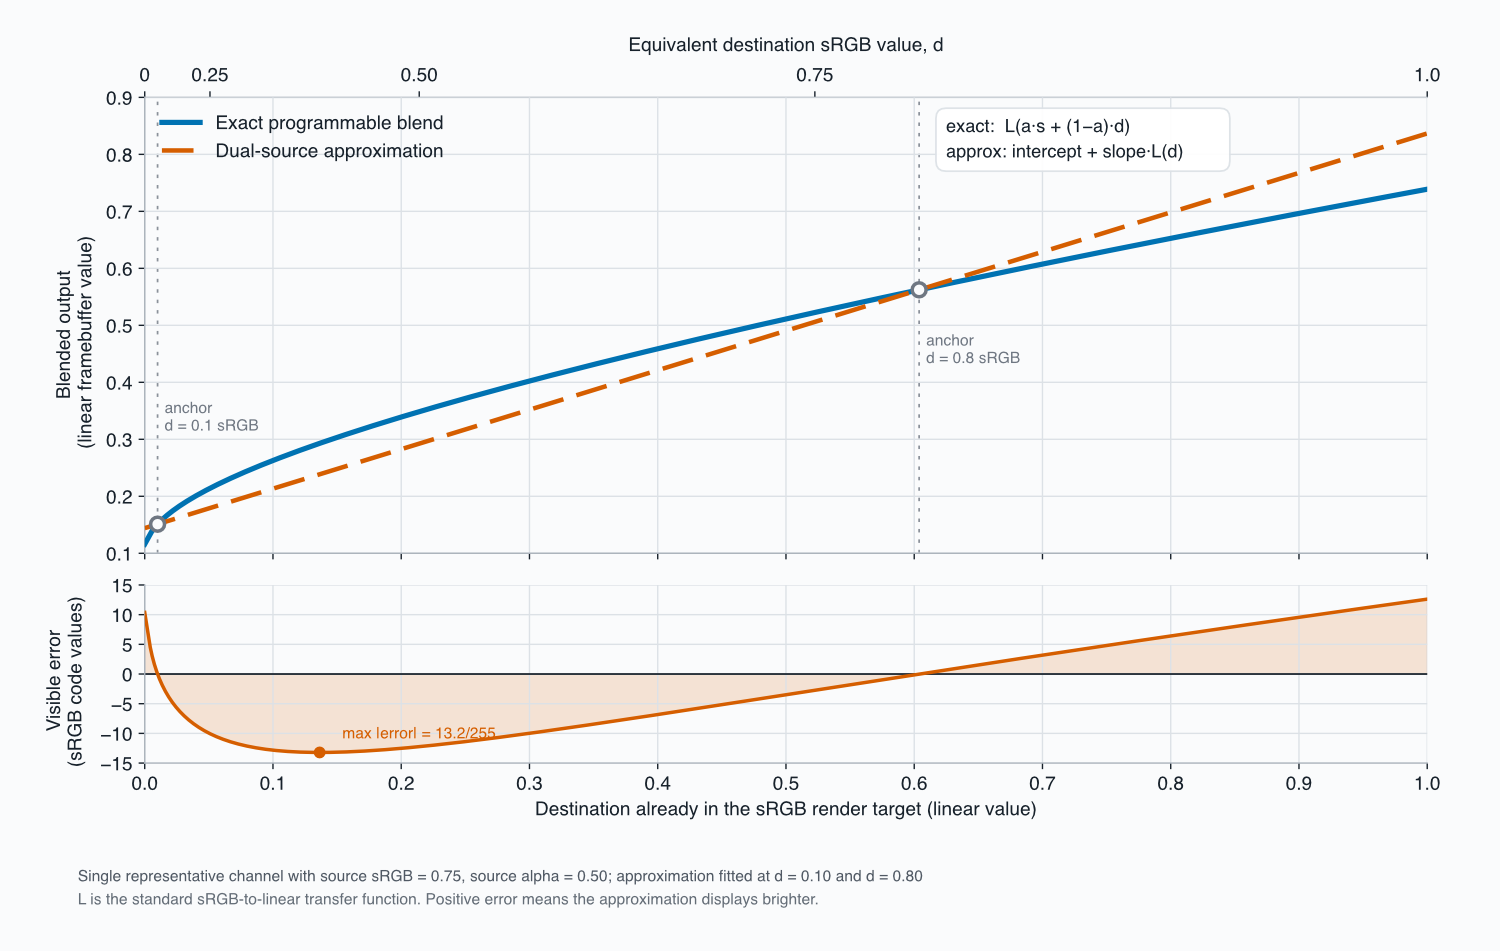
We evaluate the target curve at two sRGB destination values, 0.1 and 0.8, then approximate it with the line through those points. Its slope is the usual rise over run, measured against the linear destination values seen by the blend unit.
The key is how we assign the shader outputs. Source 0 is the y-intercept of the line, while source 1 holds its slope for each color channel. We use source 1 as the RGB destination factor, so the blend unit evaluates the fitted line. Let  be the source term premultiplied in the sRGB-encoded domain:
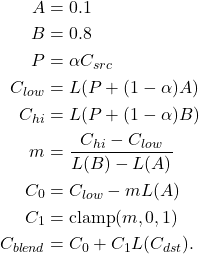
The clamp in  corresponds to the
 saturate function in MSL. When  lies in
 ![[0, 1]](https://metalbyexample.com/wp-content/ql-cache/quicklatex.com-8af39bd06126a84050b6f4b76dbd529d_l3.png "Rendered by QuickLaTeX.com") , the approximation passes through both anchor points.
, the approximation passes through both anchor points.
To implement this in Metal, we first update the fragment function:
struct DualSourceFragmentOut {
half4 color [[color(0), index(0)]];
half4 destinationScale [[color(0), index(1)]];
};

fragment DualSourceFragmentOut fragment_main_dsb(
    VertexOut in [[stage_in]],
    texture2d<half, access::sample> texture [[texture(0)]],
    sampler textureSampler [[sampler(0)]])
{
  half4 source = half4(in.color) * texture.sample(textureSampler, in.texCoords);
  half3 premul = source.rgb * source.a;
  half transparency = 1.0h - source.a;
  constexpr half anchorA = 0.1h;
  constexpr half anchorB = 0.8h;
  constexpr half linearA = 0.01002283h;
  constexpr half linearB = 0.60382734h;
  half3 linearAtA = linear_from_srgb(premul + transparency * anchorA);
  half3 linearAtB = linear_from_srgb(premul + transparency * anchorB);
  half3 destScale = (linearAtB - linearAtA) / (linearB - linearA);
  DualSourceFragmentOut out;
  out.color = half4(linearAtA - destScale * linearA, source.a);
  out.destinationScale = half4(saturate(destScale), 0.0h);
  return out;
}
On the Swift side, only the RGB blend factors change:
att.sourceRGBBlendFactor = MTLBlendFactor.one
att.destinationRGBBlendFactor = MTLBlendFactor.source1Color
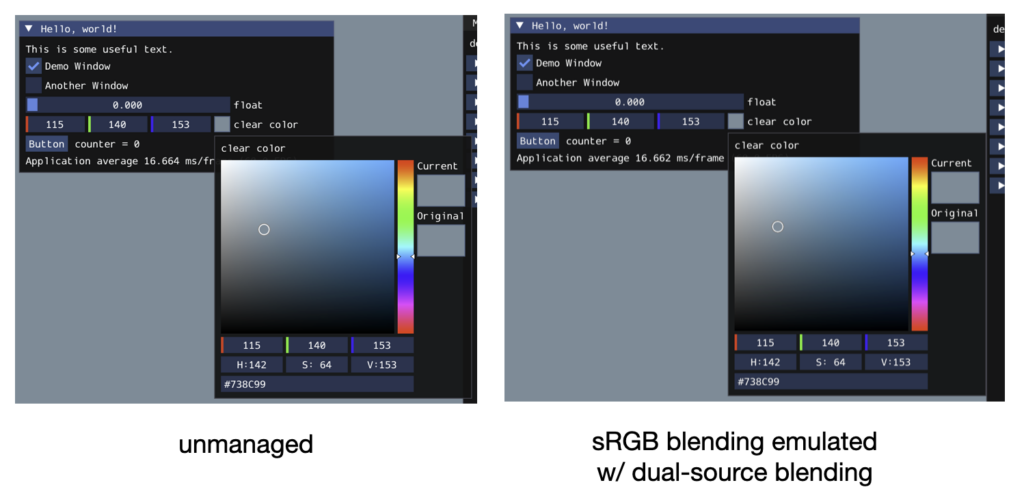
The results are pretty satisfying, though the affine approximation does lose some accuracy. The example above reaches an error of about 13 sRGB code values, and the absolute max error is about 15. The difference is visible, especially in dark shades, but I think this is about as close as fixed-function blending can get.
However, there is an even better way.
A Better Solution
As I wrote up this approach, I realized I had missed a better option. Apple Silicon GPUs use a tile-based deferred rendering (TBDR) architecture, which breaks the framebuffer into tiles processed in on-chip memory. A fragment shader can cheaply read the current value of its pixel from that memory. This feature is often called framebuffer fetch.
So far, we’ve tried to squeeze more flexibility out of the fixed-function blend unit. Framebuffer fetch gives us the missing destination value, so we can do the blend ourselves and skip the fixed-function path entirely. This technique is called programmable blending. This isn’t a new idea: framebuffer fetch was available on iPhone through OpenGL ES before Metal was released.
Our goal is to produce the value that ImGui would write to a non-sRGB target. We blend the sRGB-encoded values ourselves, then decode the result to linear light. The sRGB render target encodes it again as it stores it, leaving the value we wanted in the attachment.
We generate the source as usual by multiplying the interpolated vertex color by the sampled texture value. Metal gives us the fetched destination as linear-light RGB, so we encode it back to sRGB. Next, we perform the same numeric source-over operation that fixed-function blending would use on a non-sRGB target. Finally, we decode the result so the sRGB target can encode and store it correctly.
In shader code, it looks like this:
fragment half4 fragment_main_fb_fetch(
    VertexOut in [[stage_in]],
    half4 destination [[color(0)]],
    texture2d<half, access::sample> texture [[texture(0)]],
    sampler textureSampler [[sampler(0)]])
{
  half4 source = half4(in.color) * texture.sample(textureSampler, in.texCoords);
  half transparency = 1.0h - source.a;
  half3 destinationSRGB = srgb_from_linear(destination).rgb;
  half3 blendedSRGB = source.rgb * source.a + destinationSRGB * transparency;
  half3 blendedLinear = linear_from_srgb(blendedSRGB);
  half blendedAlpha = source.a + destination.a * transparency;
  return half4(blendedLinear, blendedAlpha);
}
If you haven’t seen framebuffer fetch before, the only new part is the destination parameter with the [[color(0)]] attribute. It exposes the current value of color attachment 0 as an input to the fragment function.
Because the shader now does the blending, we can disable fixed-function blending.
The result is nearly perfect.
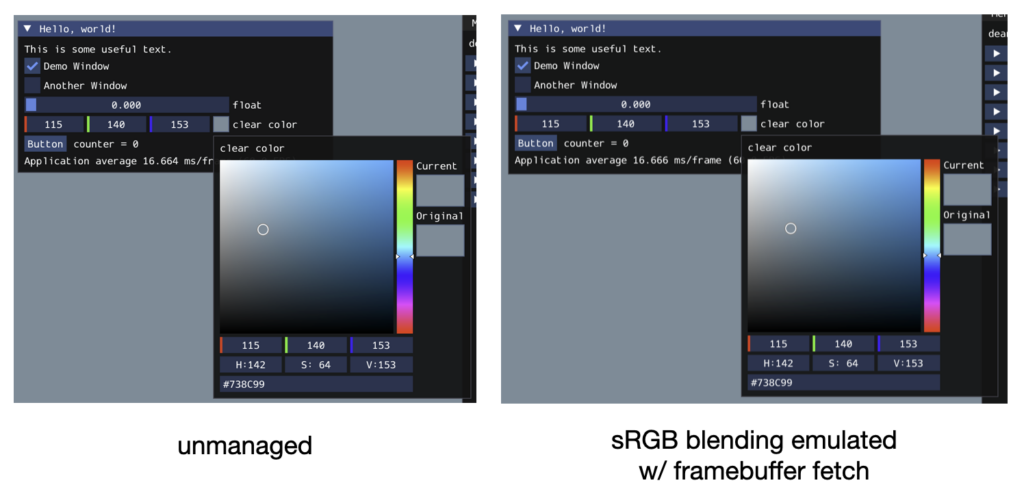
Unlike the dual-source approximation, this approach algebraically matches ImGui’s usual source-over operation. There are two important caveats:
- Programmable blending has been available on every physical iPhone that supports Metal, starting with the A7. On Mac, it requires Apple Silicon; Intel-based Macs don’t support it. The Simulator doesn’t support programmable blending, either.
- The shader’s finite precision and the repeated sRGB conversions can introduce rounding error. An 8-bit attachment also quantizes every stored result, so repeated compositing may produce banding or small color errors. I haven’t seen any serious problems in my tests.
One Final Caveat
If you’re using either of these techniques to composite sRGB offscreen content into ImGui, you should supply it to ImGui as a texture view in a linear format (e.g. .rgba8Unorm for a .rgba8Unorm_srgb source texture). That way, it won’t get decoded automatically and will match the assumptions of our shaders.
Conclusion
This took me down an interesting path. After trying several shader hacks, I was starting to doubt that I’d find a good solution. Rediscovering dual-source blending was a happy accident; remembering framebuffer fetch was even better.
This isn’t the final word on color correctness. sRGB defines both a gamut and a transfer function, while this technique mainly recreates ImGui’s usual behavior in the sRGB-encoded domain. For an example of what this looks like in the context of an actual ImGui Metal backend and example project, you can check out my ImGui fork here.
Display P3, now common on Apple devices, has a wider gamut but uses the sRGB transfer function. Supporting multiple gamuts requires color-space tagging and conversion. HDR standards such as Rec. 2100 also add extended range and transfer functions such as PQ and HLG. Those workflows often need higher-precision formats and a more deliberate color-management strategy.
As a stopgap, though, I’m quite happy with framebuffer fetch. Maybe sometime in the next decade, ImGui will support sRGB render targets without hacks like these.
- Early versions of iOS did the premultiplication and byte reordering at compile time. They stored the result as nonstandard PNGs in the app bundle to avoid that work at runtime. ↩
- Linear-light RGB isn’t always the best space for interpolation. Oklab, for example, can produce more pleasing gradients. A color picker might also preserve an established sRGB-encoded behavior on purpose. There is no single right choice, but conventional source-over compositing and filtering, including mipmap generation, are physically meaningful in linear light. ↩
Very interesting post. I’ve seen framebuffer fetch is also used in PCSX2’s Metal renderer to emulate PS2’s programmable blending. Apparently it’s a very performant solution.
Neat, I wasn’t aware of that project. If I’m not mistaken, blending has been implemented as a shader post-amble on TBDR systems for a while, so I’d expect that my “manual” approach would be quite competitive, though it is dragged down by all the ALU required to repeatedly encode and decode sRGB.